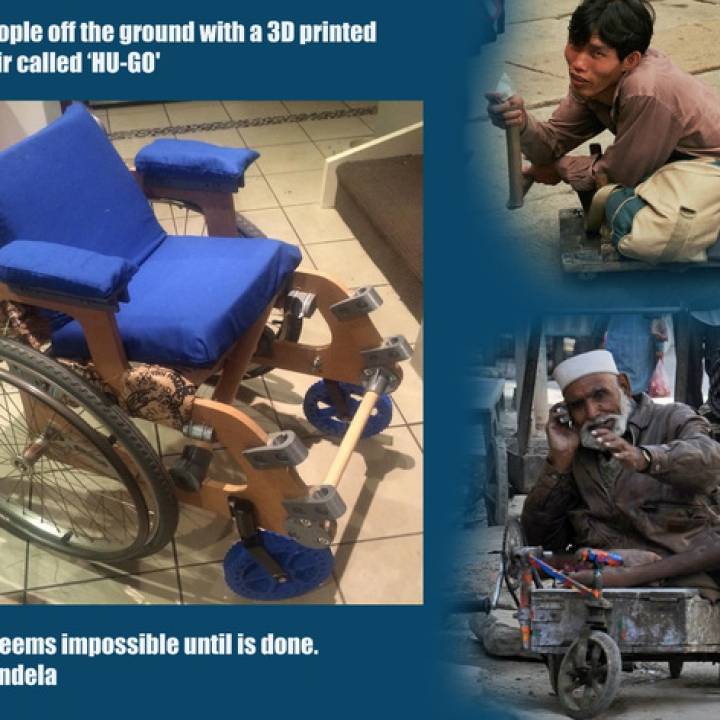
Wheelchair for people in 3rd world countries "HU-GO"


Wheelchair for people in 3rd world countries "HU-GO"
Published 2015-11-19T12:40:50+00:00
Its a wheelchair for people that need one!
I call it 'HU-GO'
I am adding more parts daily.
I have modelled most of it now.
I have just started 3D printing the first bits.
update 1: I have finished printing all the parts now (25th oct 2015 and the cutting of the MDF started today ( my jigsaw ability leaves a lot to be desired)
update 2: I am printing one small wheel and if I have time I will print the other (28th oct 2015).
update 3: arm for chair has been modified (the new one uses less material and quicker to print) I will leave the other file in case someone wants that one instead.
update 4: I have almost finished (31st oct 2015), I learned how to do sewing today. So I did the cushions and the armrests.
update 5: what next now that it is finished ?(Sunday 1st Nov 2015 Australia)
update 6: Its fits in the back of my little car (so if it fits in a MINI then it fits in most cars(photo added to gallery)
update 7: We have a very short youtube video here of the 3D printed wheelchair in action (dont mind my friends at work who are a little shy):
update 8: I am adding the sizes of nuts and washers I used for every connection(see photo added below). (the holes are bigger and could take a large bolt if you need to secure it more, but from my experience they are strong enough
update 9: I have added more photos with a wide angle lens and much closer shots.
update 10: Today I got a response from the Mens shed (a government organisation that helps men suffering depression and helps them with projects and company).
update 11: I was contacted by a Sydney based Australian organisation today who have offered a lending hand.
I have emailed Ikea foundation http://www.ikeafoundation.org/ to see if they would like to help me. We wait and see
Dear Hugo
Thank you very much for your interest in responding to the Village News article on Spring Hill Men's Shed.
I am certain that your expertise in 3D printing would of worthwhile appeal to shed members.
At this stage, however, we are not yet operating as a men's shed, but are still in the process of forming an incorporated organisation for the management of our shed. We do, at least have a venue for the shed, in the undercroft of the Bedford Park Community Hall in Love Street Spring Hill.
I have noted your willingness to become involved, and will contact you again when we are about to have our next meeting.
regards
Rob Collins
on behalf of the Men's Shed Spring Hill Management Committee.
update 11: I have the sketches for the big wheel which i know know i can 3D print also.
i am adding those sketches now!!
UPDATE 12: THIS DESIGN HAS BEEN SHORTLISED FOR ANOTHER COMPETITION ORGANISED BY THESE GUYS (I THINK IS THE INTERNATIONAL COMITTEE OF THE RED CROSS)(12-15 TEAMS ONLY, I AM A TEAM OF ONE!)
http://www.enablemakeathon.org/
Start by share it wherever you can and start printing it worldwide!!!
Why not make it a school project.
some kids can sew the seat covers, others in wood class can make the frame and others can 3D print the parts, the seniors could design it better! go on its for a great cause.
I have contacted one school already near me to see if they would like to get a talk on 3D printing and its benefits from me free of charge (waiting for the school principal to call me back) then good things could start.....
I hope I can make the deadline. (update....I made the deadline and we now have a fully made functional wheelchair anyone can put together)
I decided to create this wheelchair because I have used one before due to my own illness,
I was a Sydney 2000 Olympic volunteer and part of my job then was to help people that are a different kind of perfect move around the Olympic park.
we even received training how to operate a wheelchair during the induction.
I have been 3D printing many things and for many people over the last 3 years and I think is time I begin to design/make something for a noble cause.
So, I thought I should pay it forward and create one that anyone in the world could make and assemble with a very common cheap parts.
I visited my country of Birth Chile a few months ago and I saw first hand how 3D printed parts for different kind of perfect people could transform their lives but sadly they didnt know where to go to get their needs met or that it could be very cheap.
I strongly Believe that everyone in the world deserves to be able to move about and a wheelchair should not be a luxury item for the few/well off.
It should be a tool that anyone should have access to use.
So, I am accepting this challenge with the 'hugo' version 1.0
Version 2.0 will have 3D printed wheels/ and or hubs also but due to the deadline I will leave it for later.
I only found this competition yesterday (19th of October 2015) so I am busily trying to get it all done in time.
Wish me luck! I am spending all of my spare time with this project.
This is a lovely thing a friend does for a mate but it should not have to be this hard!!
So, I am attempting version 1.
Version 2 will have 3D printed wheels/ and or hubs also but due to the deadline I will leave it for later.
I only found this competition yesterday so I am busily trying to get it all done.
The material list will be like this: (will be adding more as I need it)
-Plywood/MDF 16mm thick
-roll of plastic (1 kilo exactly is what will be needed to print all the components!!)
at the end I will rename each part so it has its weight in grams in case you are wondering if you have enough.
-zip ties (to support not load bearing components instead of using nuts, bolts and washers which are heavier and more expensive ( I used these for the seat support beam ends)
-rods 'broom sticks' of two sizes (50mm for cross bracing and 20mm for the others)
-nuts and bolts (will specify how many, what type, size, lenght,etc)
-paint (because the frame is kind of chunky a nice vibrant happy colour would be great (I will do version 1 in red because it will go faster)
-2 old/new long 'socks' for the arm rests
• fabric for the seats (I was thinking flour bags) and or old tshits
tools required
-Jigsaw
-drill (hand held or electric)
-screwdriver
-spanner (will specify size)
-access to a 3D printer
-access to needle and thread
-pair of scissors
and a bit of room to make it. (I live in a small apartment so my workshop was my balcony which I had to leave everytime my little dog needed to go to the toilet, he is shy and doesn't like to go when there are people watching), so a little more room would be best and a bench/table would be great to have too.
finally, I dont like the term disabled so instead I replace it with "a different kind of perfect" which I got from here (its far nicer)
note: I have started to put PDF's now.
once I do the frame today, I will make a cad file of it in PDF and DWG and STL in one piece so that maybe someone with a laser cutter machine big enough can cut it automatically.
also when the frame is done i will assemble it and begin to take photos of the real thing!!!!
This project has taken a great amount of time, effort and resources to design and build.
(As you know any prototype is expensive at first, I am happy to wear the costs)
My purpose is to share it with the world for free, however a small contribution would be a huge help to continue its development.
please go here and help me if you believe in this worthy cause.
https://www.paypal.me/justonedollar
My dream would be for this project to be copied by someone like IKEA and mass produce this flat packed and shipped wherever these might be needed as part of help that countries offer one another.
Anyone with questions or help, done hesitate to send me a message and I will endeavour to reply ASAP.
Print Settings
Rafts: Doesn't Matter
Supports: Doesn't Matter
Resolution: I have printed all my parts so far at 0.2mm res
Infill: see notes below
Notes:
Print it at a good resolution so it has all the strength it needs
my 3D printer software does not allow me to change the infill so I cannot help you.
I wish it did!!!!
my 3D printer software does not allow me to change the infill, like honeycomb etc.
so most parts are chunkier that I think they ought to be.
I see now the cross brace could be resized to the normal broom thickness instead of the 40mm which I used)
All parts are laid flat so they are easy to print.
How I Designed This
wheelchair- the 'HU-GO'
I started by looking at my own wheelchair and how the loads where distributed.
I think that formed the design more than anything.
then i began to sketch what this might look like and how many bits i would need to make.
then I began to redesign the parts so it would use the minimal amount of filament and or parts.
I also began to think how i could use normal everyday things for a useful purpose for this project in particular.
Like the idea of re using socks for the arm rests and flour bags for the seat materials.
On my next version I will be designing hubs out of filament so I can use wooden wheels cut out of plywood.
I have the design ready but not the time for this competition. ( update! I have designed and now 3D printed and installed the front wheels)
I have added my wheel design to the list of parts to download (small wheels) with tread and sacrificial bushes and also washers.
I am now attaching the big wheel design below now!!!!! thats the final piece of the puzzle!!!

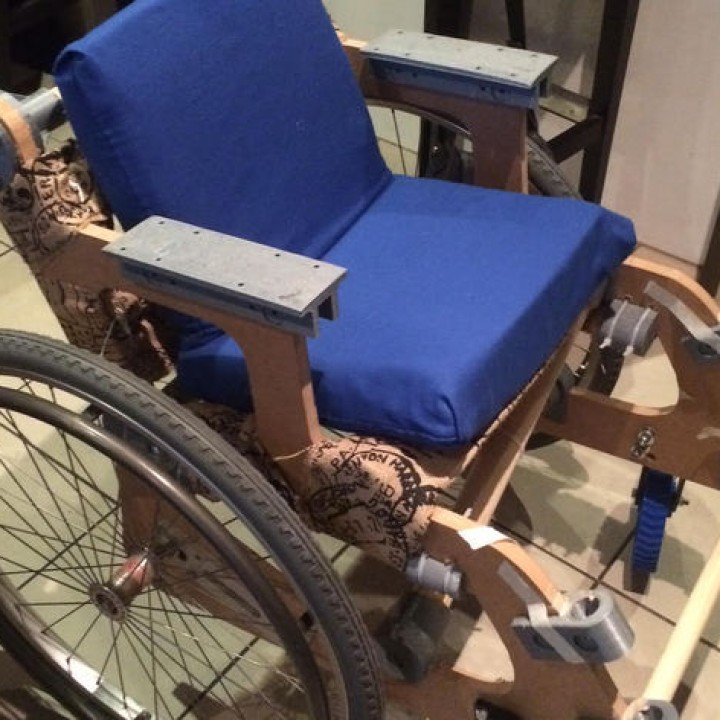
this is the frame made out of MDF or plywood and the cross bracing

I used these to hold on to the two timber frames

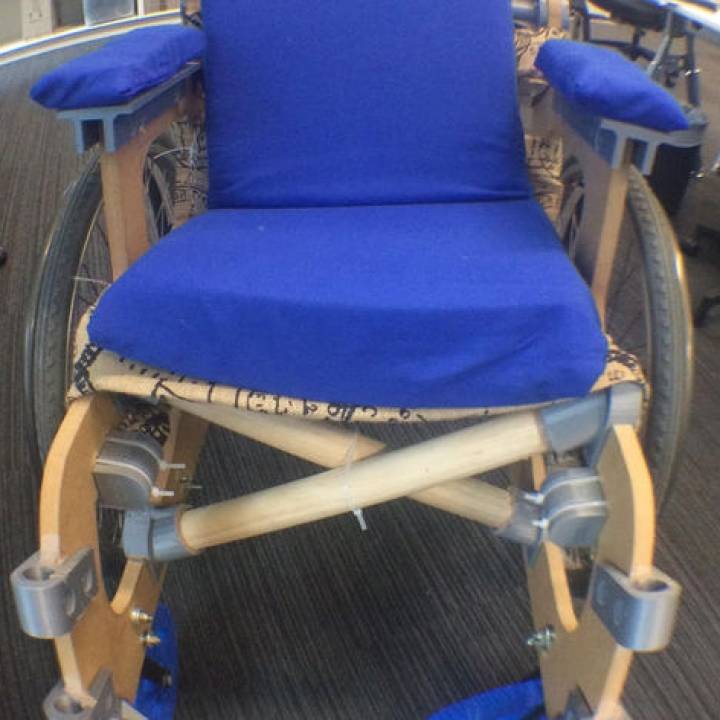
this is my cross frame support

this is the other cross brace support ( I had to make two types, one for the top and one for the bottom)

its working

these are the cross bracing supports


my jigsaw skills are improving see how the curve to the frame matches (more or less) the support with the same radii

this is my mock up design for the seat fabric support, this was the hardest thing to solve.

and this is the actual component that hold the (pencils) see image above

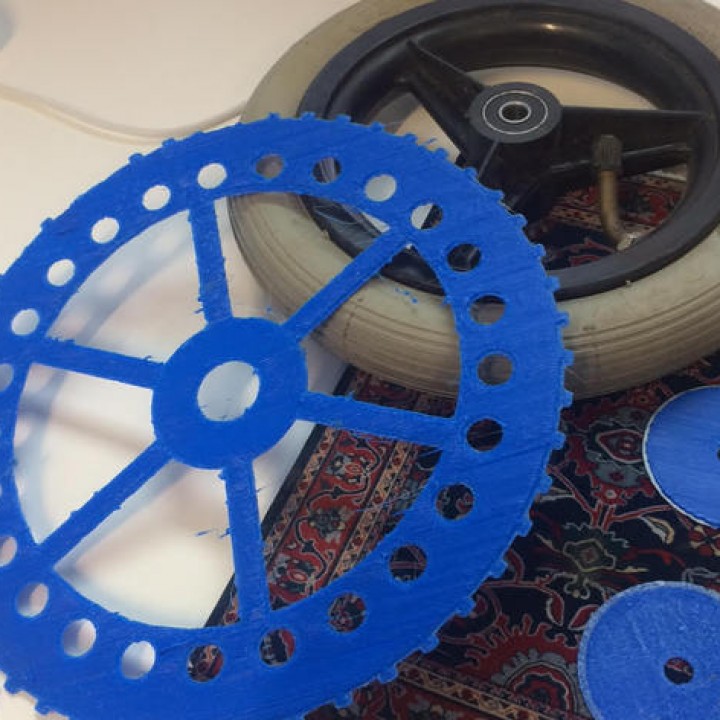
this is my check print to make sure it worked before sending the wheel to the printer because I had limited blue material. I made a sacrificial bush out of plastic to go inside the wheel and two washers out of pla also

and this is the wheel fitted and working well

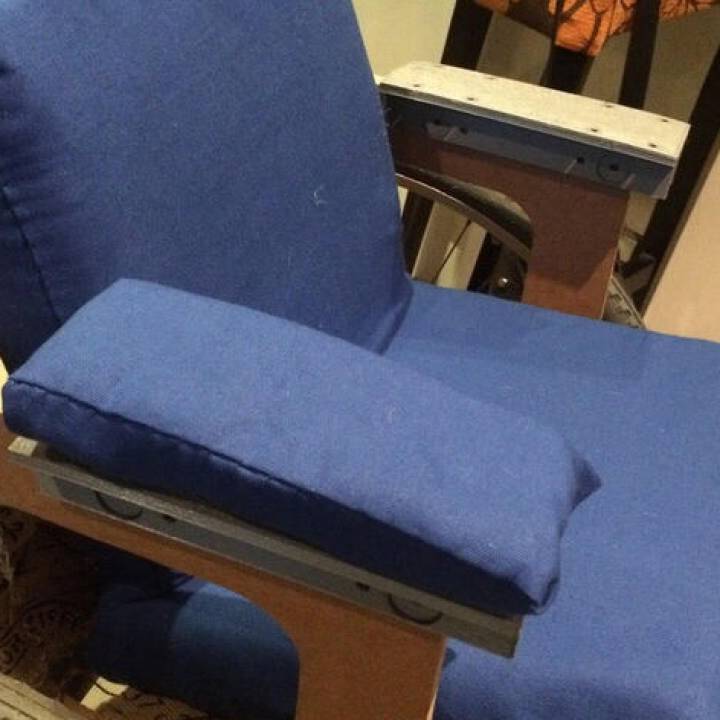
thats me sewing for the first time!! My mother in law was giving me tips over the phone

this is my sewing handiwork!! it turned out well. although I still do not know how to close the ends. I did the sewing then turned it inside out and folded the end inwards.

this photo shows the frames being cut with a jigsaw , look at my supporting table 'its 3D printed!!!'

this is the table I 3D printed last year from thingiverse and the thing that got me thinking about a wheelchair joined/constructed by broomsticks using the same principle.

it fits in the back of my MINI so it fits in most cars!! unless you have a smart fortwo..or maybe it does fit there too?!

these are the nut and washers I used for all the connections in this project

close up shot

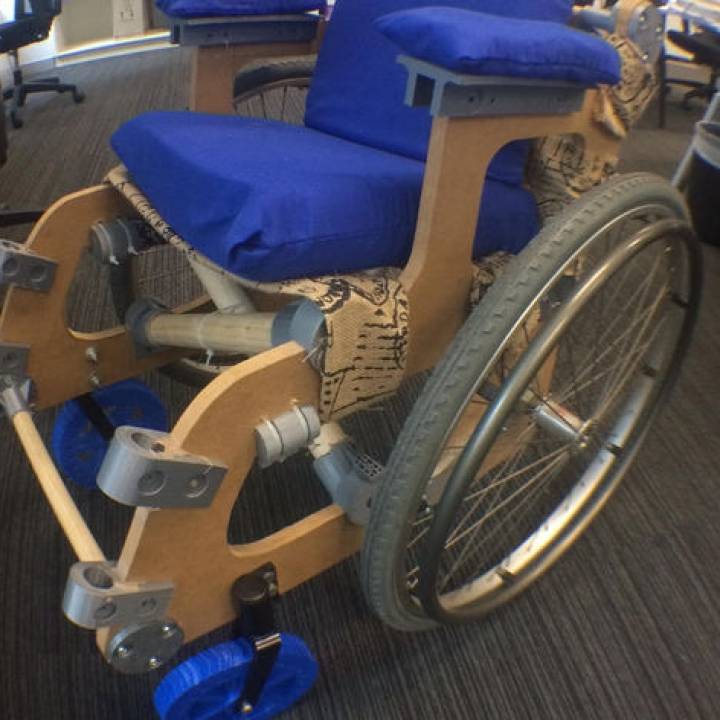
see cross bracing under seat

push bar/top cross brace

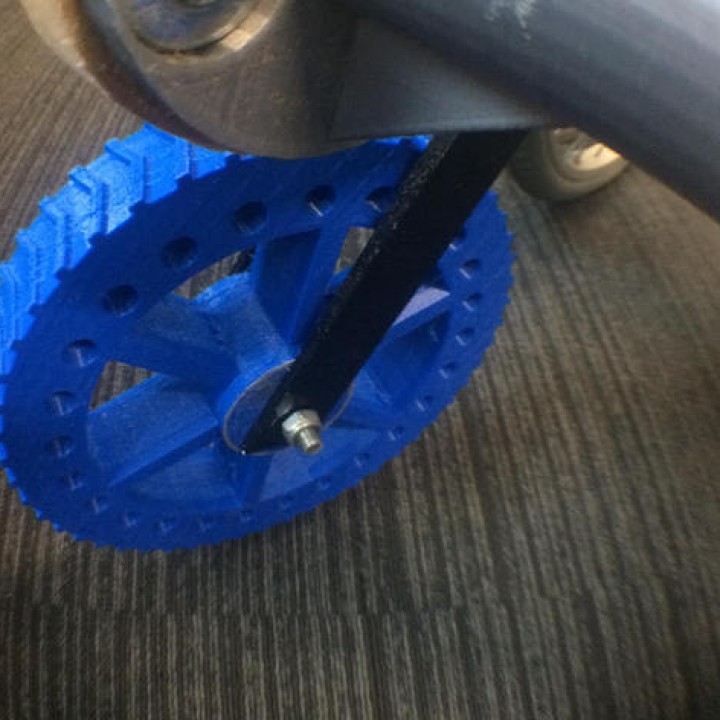
bottom brace and wheel assembly

3D printed wheel with tread! and you can also see the washers but not the bush inside which is to be replaced every so often depending on use, thus making the wheel last longer. (sacrificial bush)

bottom brace

big wheel design

this is how the big wheel would work, basically a copper pipe is filled with sand so its easy to bend and prevents cracking of the pipe, this is the tire! then the tube is blued or screwed to the 3D printed segments that connect the wheel to the hub via broom sticks ( a bit like everything else in this wheelchair design)

this is the hub drawing. it will have 'tentacles' where the broom sticks connect to.

this would be the hub with the tentacles and the way it would all connect

as you can see i cannot draw circles very well BUT the idea is sound. hub with tentacles connecting to segments which are joined by the sand filled copper pipe.


| Date published | 19/11/2015 |
| Technology | FDM |