Anycubic Mega S (Pro) X Carriage Sherpa Mini Carrier Plate V5 (Stock) Hotend
Anycubic Mega S (Pro) X Carriage Sherpa Mini Carrier Plate V5 (Stock) Hotend


Print Profile(0)
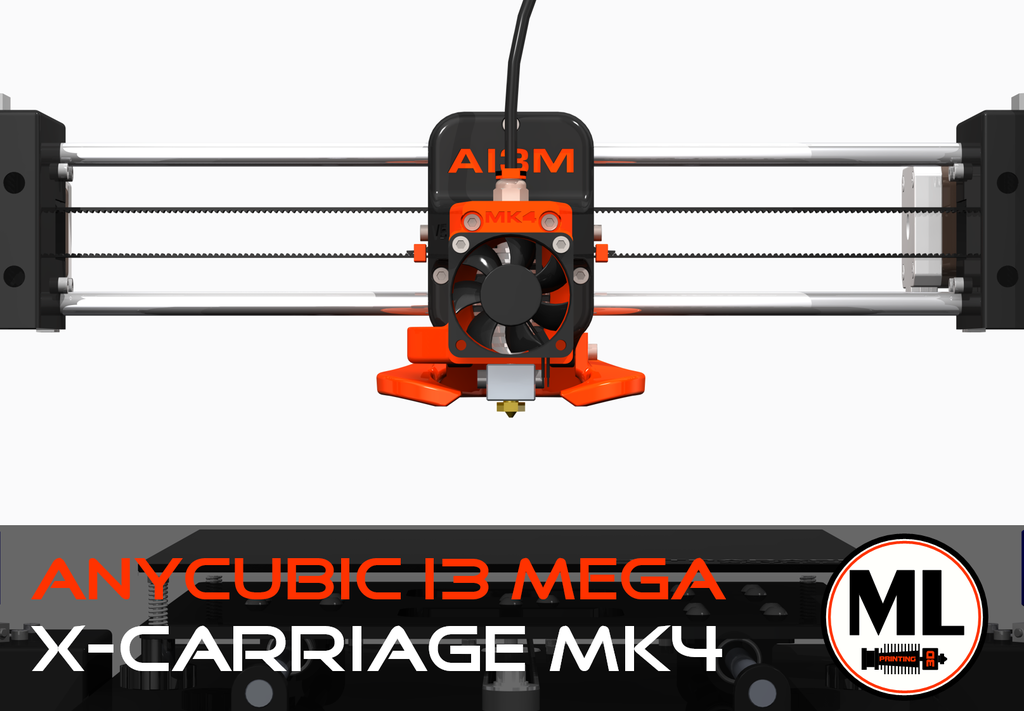
Description
Summary
This started off as a basic project from the Video JJ Shankles did, that was until I found out the original Sherpa Mini Carrier Plates were for V6 or Volcano Linked https://www.printables.com/model/206014-anycubic-mega-s-mk4-x-carriage-mount-for-sherpa-mi &
https://www.printables.com/model/473644-anycubic-i3-mega-s-sherpa-mini-volcano-extruder-mo , thus this Tinkercad Monstrosity was made.
It works well, has enough clearance and seems to be rigid enough to have no issues, I’ve only run it for 20 hours or so in testing but am loving my Triangle Labs Sherpa Mini and on this plate it works well. Images showing the voltages from the video for reference voltage to get good results.
Images of a quick wiring splice to allow for future mods which is just a JST 2.54mm XH-4A installed in place of stock extruder cable. In my case I left 40mm of stock cable on stock extruder to easily use in another future project.
X Carriage Base Mod - https://www.thingiverse.com/thing:3537449
Config is on my GIT https://github.com/Tactical-Koala/AnycubicMegaProKlipper
Video discussing steps and some small issue may be coming in future, I’ll update here if I get to it.
BOM
Sherpa Mini Kit – Triangle Labs used in this case
22g PETG or ABS preferred but works fine in PLA, I’m yet to have a PLA one get soft just went PETG as I had that loaded.
4 x M3 Heatset Inserts
In my case it was 3 x M3 x8mm to install to carrier as per X Carriage Build
2 x M3 x 16mm to install Sherpa Mini to mount.
2 x M3 x 16mm to install Cover plate over Carrier Plate as per standard build
53mm (est) Capricorn tube from Extruder to nozzle and 400mm Capricorn tube as reverse Bowden (not necessary in many configs)
Installation
Print Carrier plate and all other pieces of X Carriage as wanted, insert all heat set inserts.
Remove old print head and install X carriage as per guide.
Uninstall old extruder, with machine off cut off old extruder plug ideally with a bit of extra length in my case 40mm but anything you can reconnect or solder is worth it. On cable coming from mainboard carefully solder on ensuring heatshrink is on wires the XH-4A or suitable for your kit. Shrinking down heatshrink when finished over connections.
Flip over printer, remove bottom and begin the process of adjusting stepper motor E0 on 0.0.2 Trigolla board. Many Youtube videos on this just be very careful as machine will need to be on during this step. Image taken from JJ Shankles Video on this I went with 0.52V on mine, a small screwdriver and a decent Multimeter is needed for this. https://youtu.be/GHtCsK7zlVs?si=IcIz4Qgw93iqvr9E Video Link of JJ Shankles.
Once voltage is set and you’re happy power down machine and reinstall base.
Install carrier plate and hotend, hotend, coverplate and installed onto carriage before installing Extruder worked best for me. Check Z Height and ensure that Capricorn tube from hotend is snug (Firmly) into the bottom of the extruder. In my case I ran the wires and the reverse Bowden tube roughly at this stage with some quick dirty tidying. Connect Extruder and start up machine.
If running Klipper I have a base config in my GIT if running Marlin you may have to check extruder direction and potentially swap some pins around to reverse direction.
Now you’re done with the installation, PID, Esteps (Rotation Distance) and the like will be needed but check the Z Height before doing anything else as it might now be slightly different.
In slicer I had to change max Z height to 170 but you might be able to push a bit more.
Print Settings
Printer Brand:
Anycubic
Printer:
i3 Mega S/Pro
Rafts:
Doesn't Matter
Supports:
Doesn't Matter
Resolution:
0.2
Infill:
20-40%
Notes:
22g PETG or ABS preferred but works fine in PLA, I’m yet to have a PLA one get soft just went PETG as I had that loaded.
I printed this at 4x4x4 at 20% and it might have been slightly overkill but works well.
Post-Printing
Basic install steps
Print Carrier plate and all other pieces of X Carriage as wanted, insert all heat set inserts.
Remove old print head and install X carriage as per guide.
Uninstall old extruder, with machine off cut off old extruder plug ideally with a bit of extra length in my case 40mm but anything you can reconnect or solder is worth it. On cable coming from mainboard carefully solder on ensuring heatshrink is on wires the XH-4A or suitable for your kit. Shrinking down heatshrink when finished over connections.
Flip over printer, remove bottom and begin the process of adjusting stepper motor E0 on 0.0.2 Trigolla board. Many Youtube videos on this just be very careful as machine will need to be on during this step. Image taken from JJ Shankles Video on this I went with 0.52V on mine, a small screwdriver and a decent Multimeter is needed for this. https://youtu.be/GHtCsK7zlVs?si=IcIz4Qgw93iqvr9E Video Link of JJ Shankles.
Once voltage is set and you’re happy power down machine and reinstall base.
Install carrier plate and hotend, hotend, coverplate and installed onto carriage before installing Extruder worked best for me. Check Z Height and ensure that Capricorn tube from hotend is snug (Firmly) into the bottom of the extruder. In my case I ran the wires and the reverse Bowden tube roughly at this stage with some quick dirty tidying. Connect Extruder and start up machine.
If running Klipper I have a base config in my GIT if running Marlin you may have to check extruder direction and potentially swap some pins around to reverse direction.
Now you’re done with the installation, PID, Esteps (Rotation Distance) and the like will be needed but check the Z Height before doing anything else as it might now be slightly different.
In slicer I had to change max Z height to 170 but you might be able to push a bit more.
How I Designed This
Design Process
I grabbed 2 not right models, an original and butchered them in Tinkercad into this. You can see the added bits, removed bits and overall roughness of this design but it is functional and easy to print so I didn't bother remaking from scratch.