Reduce purge by up to 45%.
Reduce purge by up to 45%.


Print Profile(0)
Description
This Feature got implemented for P1 and X1 in BambuStudio Beta 1.9. Please use this, as you can easily adapt the retraction length and turn the feature on and off as you please. A1 and A1 mini still have to use the download here.
Description:
TLDR: This mod allows you to use a lower flush multiplier without the color bleed that it would have with the default profile.
Great video by butter pocket prints explaining this change.
How to use it:
- Open the 3mf file and save the Nozzle Profiles of your Printer to your User Presets. It will tell you that the G-Code was changed, confirm with OK, as this is exactly how the profile works. The profile name has to be changed to save it.
- Now you need to adjust your purge settings! I would just set the multiplier to 0.5 on P1 and X1 and 0.65 on A1 and A1 mini. The values may now show red in the purge settings, but they will still work.
!Dont use with Silk PLA! !Confirm that you are running the newest Version of Bambu Slicer. Orca Slicer may work but is not tested!
Original Post from 14.09.2023 on Printables with the title “bambulab profile for up to 60% purge reduction” which has sadly since been deleted by prusa:
Orginal Description:
The biggest issue with The Bambulab printers is that during multicolor printing ridiculous amounts of purge (dubbed poop by some) are generated, when switching colors.
(Example: https://reddit.com/r/BambuLab/s/iMiT0Bis6i or https://reddit.com/r/BambuLab/s/wDpB3A3N6k)
This has to be done to clear the Printhead of the old color and replace it with the new color.
The Print head has a internal volume bellow the cutter of 110 mm3, meaning that at least 110 mm3 of filament has to be flushed and an additional amount to account for the transition when the old color mixes into the new color.
Of these 110 mm3 in the hot end, only half get melted, as the rest stays in the cold part around the heat sink.
Here comes a neat trick I found: Before cutting, the unmelted part can get pulled up so that it can be fed back into the AMS. When the new filament is feed into the hotend, it gets pushed in an additional 20mm.
This means that for every filament change 50mm3 of filament is saved.
As a result much less purge volume is required.
When the print ends, the filament also gets pushed out 20 mm, to also save filament here.
The filament gets pushed out another 20mm during purging when starting the print too, to account for the push-back when the print ends.
The saving results can be seen in the first picture.
I used this model (https://www.printables.com/model/536401-bambu-lab-ams-purging-strips-p1p/files ) by Joey_466945 and printed it once with the „Save filament Profile“ and once with the normal on. The flush Volumes have to be set to 0 for this test! Each line on the strips corresponds to 100 mm3. It’s clearly visible that each transition is shifted by 50mm3.
For advantageous color combinations like blue and red these 50mm3 savings correspond to a very high saving percentage. Combinations which have a lot of color bleed like white to black need a lot of purging still, so the percentage saved is much less.
I printed two benchies for comparison (the left one is the saving Profil) and the quality stayed the same, despite the flush volumes being reduced by 50mm3. The benchy with my profile generated 60% less purge.
Both prints used a prime tower though which stayed the same size.
The Profile only changes 8 lines of code in the G-Code.
I tested thousands of filament changes and had no issues. Tests have been done on X1C, P1P, P1S and A1 mini.
Edit: Silk PLA and Bambu support material should not be used with this profile. Tests by Bambulab indicate problems.
—————————————————————————————————————————————————
UPDATE 01.02.2024: I made a mistake with the A1 and A1 mini profiles. Retraction was now lowered and should improve reliability. Max. savings with A1 and A1 mini is now 33% and the net savings per filament change is 36 mm3. P1 and X1 still have a max saving of 45% and a net saving of 50 mm3. This is due to the changed geometry of the hotend, because the hot zone is a bit longer. This reduction is more on the conservative side, it is probably possible to get away with more savings, but I can’t test it yet as I don’t have a A1 or mini.
UPDATE 25.01.2024: Bambulab updated the A1 and A1 mini print profiles, so I also updated them to the current version.
I have also heard back from Bambulab and they are testing the feature. They have run into problems with Silk PLA though, so it seems it works not with all filaments perfectly. @EyemJoe also mentioned problems with Support filament. If you use these two filaments be careful.
UPDATE 11.01.2024: I changed the start G-Code as on some printers the Load Line was incomplete on some printers.
Thanks to @Cosquilla_523214 for pointing me to the issues and suggesting a fix. I also changed the title, as the calculated maximum saving is 45% for this method and not 60% as the title stated before. The 60% was what I observed on my testprint, but this was with a small quality reduction. 45% is without a quality reduction.
I have also found out that Bill from 3D chameleon also was using retractions to reduce waste on the Bambu Printers a couple of months before me. I independently came up with this, but his hardware based solution is also very interesting. The big difference is, that my profile doesn’t require any hardware changes. If you are interested in multi color printing, his Chameleon is very interesting and was one of the smartest and best solutions before the Bambu AMS. It also makes Multi-color printing possible on any printer. If you are interested visit his Website, where he will also soon launch the MK4 version.
UPDATE 18.12.2023: Now Profiles for all Bambu Printers and all Nozzles including A1, A1 mini and X1E.
Thanks for @rc2k7_1528233, @Sven and @AustinWolt_1104655 for testing the A1 mini Profile.
@AustinWolt_1104655 also made a Video explaining how to use the Profiles.
UPDATE 12.12.2023: I added profiles for all nozzle sizes and Printers including the P1P, P1S, X1C and one experimental profile for the A1 mini.
All the profiles are saved in the same file. Save those you need to your User Presets.
I also slightly updated the documentation in the code to make it more clear.
UPDATE 20.09.2023: G-Code was modified so that the calculated amounts of waste from Bambu Studio are accurate. Before there was a small discrepancy.
I also wrote the G-Code down below with instructions how to use the settings without the download.
—————————————————————————————————————————————————
To use the changes without the download do the following:
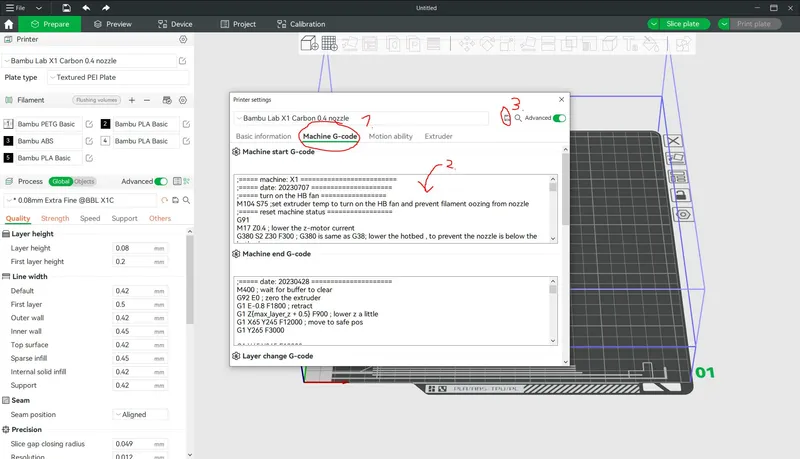
To use these changes go into Printer Profil and select one of the Profiles you want to change. If you dont use any custom profiles, just use the standard, in my case “Bambu Lab X1 Carbon 0.4 Nozzle” for the 0.4 Nozzle. 
Then go into “Machine G-Code” and edit the G-Code in 3 of the text fields like described below. Save the changes afterwards.
Changes to the g-code are marked bold in the PDF documentation.
Documentation (3)
Comment & Rating (213)


